Whether you’re a small business juggling multiple business tasks, or a marketing agency running dozens of ad campaigns, we all can do with the automation of some processes. Leave a routine job to “machine” and take care of more creative stuff that can’t be done without your presence.
Defining your target audience and setting up an ad on Facebook might be just the tip of an iceberg. The management of your ads is the most time-consuming and crucial phase in ensuring the success of your ad campaign.
You should constantly analyze the performance of your ads to stop wasting money and cut off the underperforming ones and invest more of your budget into the “winners”.
Ads optimization takes a lot of your time and attention while you might be missing out on changes required to be made quickly to avoid losing time and money. Automated rules take actions instantly. It won’t lose a second to stop an ad costing you $20 per click if you say so.
Automated Rules is a tool inside your Facebook Business Manager designed to assist you in managing your ads. Its value is immeasurable when you have dozens of campaigns to manage on your own and don't have enough time to review all of them on a daily basis.
Basically, what you do is set a criterion that triggers some action when the predefined condition is met. For example, you can set the ad to be turned off when CPR is greater than $20.
It doesn't fully relieve you of responsibility to monitor the overall performance of your ads but it helps you significantly reduce time spent on checking up the results in each of your campaigns, ad sets or ads. It can help you quickly detect ads that underdeliver and can either notify you or pause it itself.
How to find automated rules in your Ads Manager?
There are two ways to access the automated rules in your Business Manager. The Automated rules tab is easily found if you click on the dropdown menu in the top left corner.
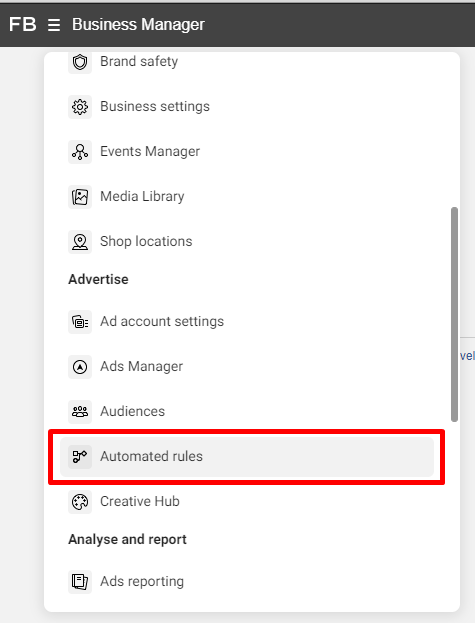
This way you'll be redirected to a page where all your automated rules are stored. Here you can create a new rule or manage existing ones.
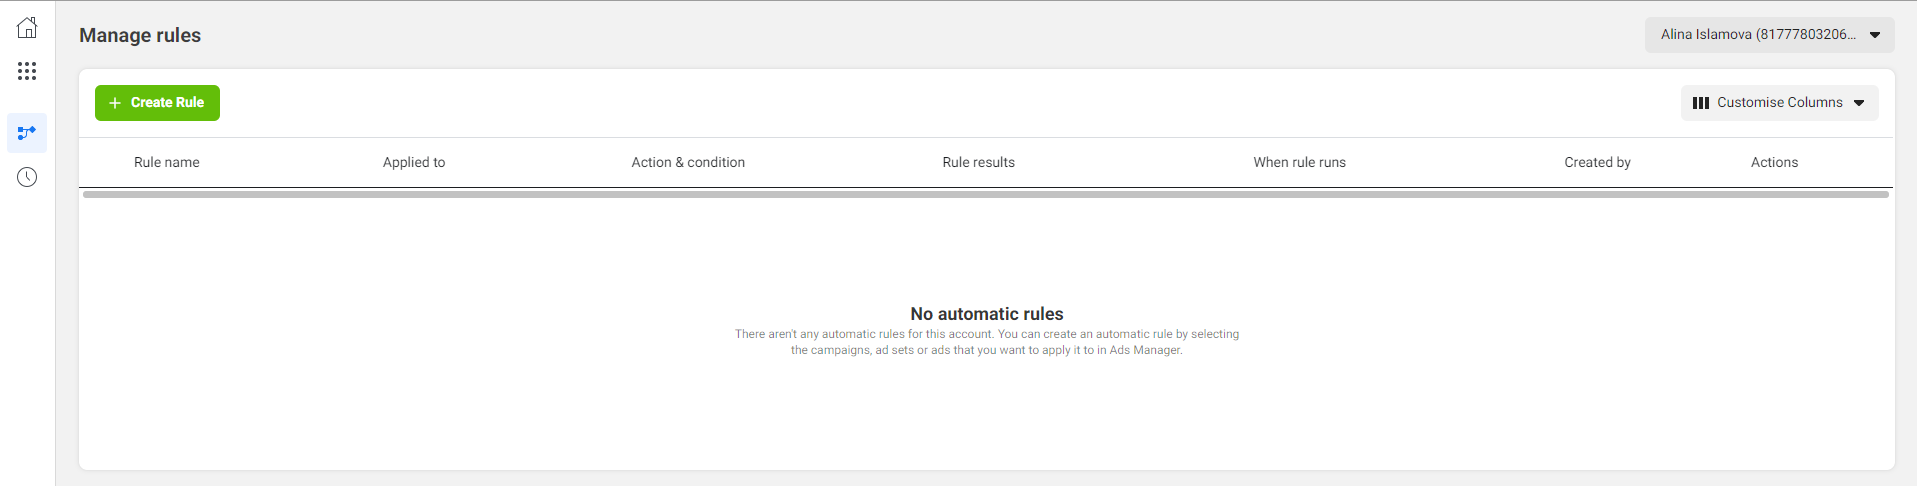
The difference is that in this section you can only create rules that will apply to all active campaigns, ad sets or ads in bulk.
You can create a rule for a specific campaign, ad set or ad. In this case you need to go the other way:
- Open your Ads manager,
- Select the level on which to set up a rule: Campaigns, Ad sets or Ads,
- Click on Rules > create a new rule.
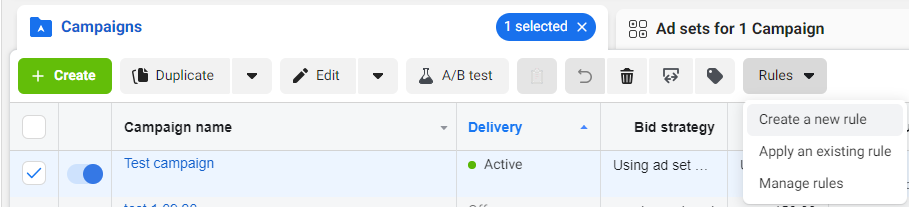
Thus you'll be able to set up a rule for one selected item.
How to set up an automated rule?
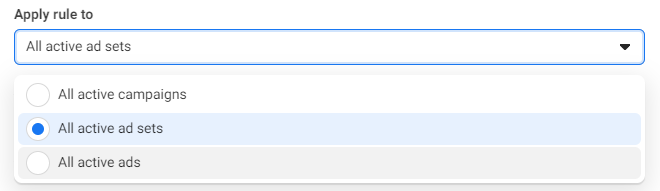
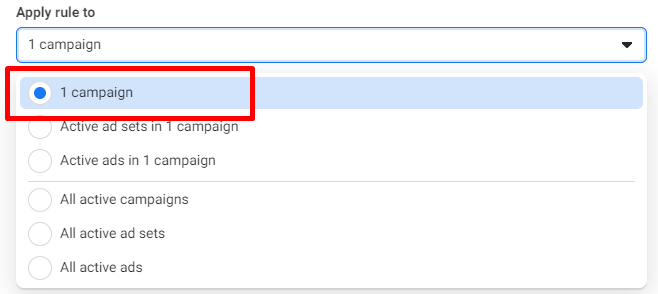
Basically, when setting an automated rule you define 3 main aspects:
- what campaign, ad set or ad the rule will apply to,
- what action should be taken by Facebook,
- under what condition should this action be implemented.
There are different variables you need to set up after you click on Create a rule.
Step 1. Rule name
The name of the rule should be as descriptive as possible. For example, you can enter the action and condition used in this rule so that you could quickly find the necessary one between various rules.
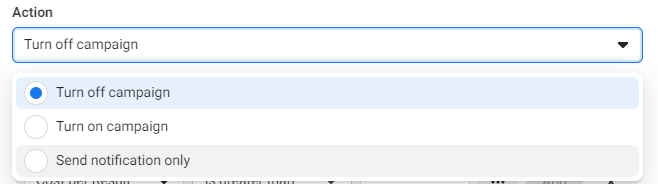
Step 2. The action level
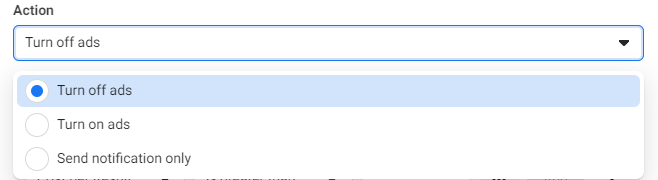
The Action is basically what should be done if the set condition is met. Your campaign/ad set/ad can be turned off or turned on under certain conditions. Or Facebook can simply send a notification to your email so that you could further take the necessary actions yourself.
Facebook offers the following actions to apply:
- On the campaign level
- On the Ad set level
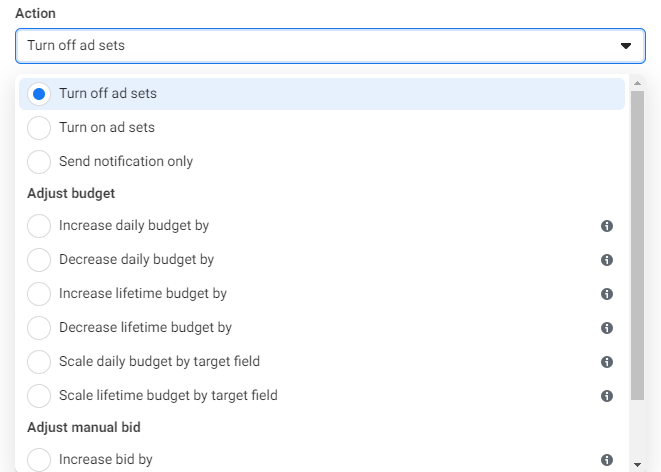
As can be seen from the screenshot above, the automatic changes can also be made to your budget: increase or decrease the daily budget, increase or decrease lifetime budget; and manual bid: increase, decrease or scale bid by target field. - On the Ad level:
Step 3. Conditions
Let's dive into the options presented concerning different conditions for the rule.
Condition is what metric Facebook should evaluate in order to execute the predefined action. At the moment Facebook offers the following conditions:
- Cost per add of payment info
- Cost per add to cart
- Cost per add to wishlist
- Cost per registration completed
- Cost per checkout initiated
- Cost per Lead
- Cost per App Install
- Cost per Purchase
- Cost per result
- Website content views
- CPM (cost per 1,000 impressions)
- Estimated budget spending
- Hours since creation
- Frequency
- Impressions
- Reach
- Results
- Name in UI
- Objective
- Start time
- Stop time
- Buying type
- Billing event
- Optimisation Goal
- Daily budget
- Lifetime budget
- Spend cap
- Bid amount
- Created time
- Updated time
- Placement
- Budget Type
- Hours since creation
- Estimated budget spending %
- Audience reached %
- Active time in seconds
- Current time in seconds
In case you don't know the meaning of some metric Facebook has it all explained. Hover over the "i" icon to read a short explanation.
For each condition you can choose from logical expressions “is greater than,” “is smaller than,” “is between,” or “is not between” and insert a certain value for a condition.
You can choose more than one condition inside one rule. In other words, you can combine multiple conditions. Though in this case all the set conditions should be met in order for the action to be taken. Thus it might be a better choice to create separate rules with different conditions.
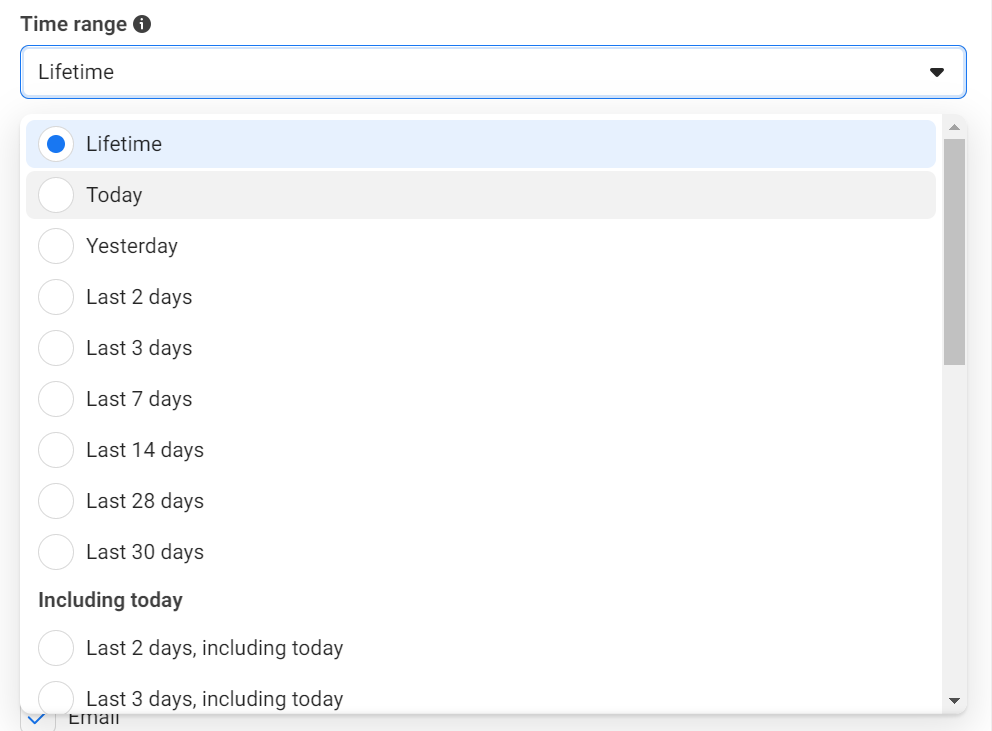
Step 4. Time range
Next, you need to select a Time range - the number of days of data you'd like your rule to apply to.
Step 5. Attribution window
Also you adjust the Attribution window that counts the days between when a person viewed or clicked your ad and eventually took an action.
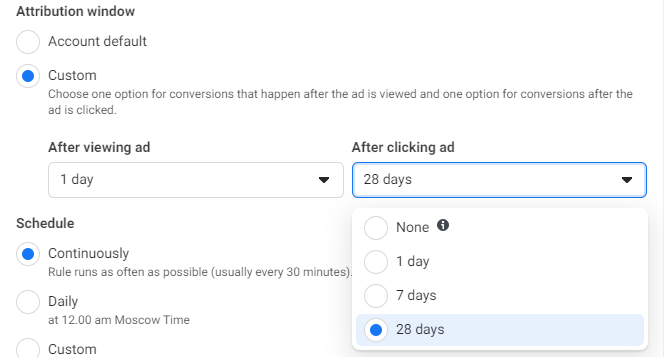
You can select the default value that you have set for your account or customize the attribution window for the rule.
Step 6. Schedule
This variable allows you to determine how often the set rule will be checked. If you choose "Continuously", the rule will more likely run every 30 minutes. You can adjust a Custom schedule and choose the days and times when you want rules to be checked.
- “Continuously” will check the rule approximately every 30 minutes
- “Daily” will check the rule every day at 12.00 a.m. Pacific Time
- “Custom” allows you to check the rule on specific days and times
Step 7. Notification
Facebook will automatically send notifications when the predefined conditions are met and the action is implemented. You can additionally set up notifications via email.

Step 8. Subscriber
There's no field to set up this variable. It indicates the users who have access to this Ad account and will be able to receive rule results.
Step 9. Manage your Automated Rules and track the activity
To manage the automated rules go back to the Automated Rules section in your Business Manager.

There’re all your automated rules with main parameters and rules results.
Here you can easily turn off the rules, preview the rule results, edit, delete, or even run the rule manually.
Strategies for Automated Rules You Should Try
When choosing the combination of actions and conditions for the rule, think about your usual behavior regarding your ads. When do you usually decide to pause an ad? What makes you take such a decision? What metric is important for you to pause an ad or, on the contrary, increase the budget?
- To avoid ad fatigue, it’s important to keep track of your ad frequency. Frequency relates to the average number of times a person saw your ad.
If you think that the more people see your ad the better result it will bring you, you’re not quite right. Your ad may start annoying people if they see it too often. It will have a negative effect on your ad performance.
Usually, the ad is considered ineffective if people see it more than 3-4 times with no result. For this reason, you can set a maximum frequency at a point of 2 and turn off an ad when the frequency is greater than 2.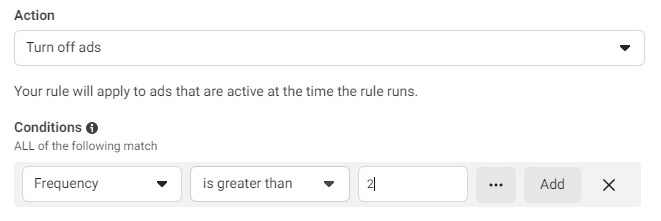
- Don’t forget about your ROAS. This is one of the most important metrics when it comes to evaluating the efficiency of your ads.
Return on ad spend shows how much you earned for the money spent on advertising. Basically, it’s ad revenue divided by ad spend. For example, if you spent $500 and earned $1000, your ROAS is 2x or 200%.
So what is a good ROAS? What value should you choose in this case? For a start, 200% or 300% is considered a good ROAS. The rest depends on your business ambitions. You can aim at 6x in return or higher, but it’s not always possible, especially when your revenue is high.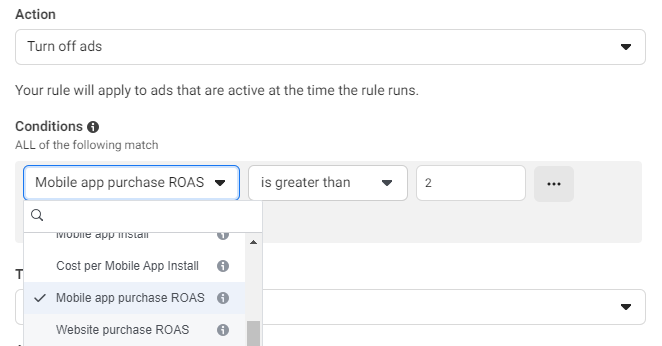
- Your ads can be sensitive to WHEN they’re shown. Depending on the page or behavior of the target audience, the particular qualities of the product, your ads may perform better or worse on specific hours or dates.
For example, if you’re sure that your buyer persona is fast asleep at midnight, you can turn off your ads until morning and relaunch them right at the time when they might be having breakfast and scrolling their feed.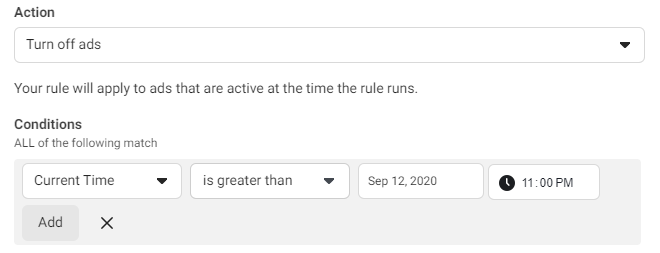 In this case, you will need to create two different rules. The first one will pause your ad and the other relaunch it on the selected hours.
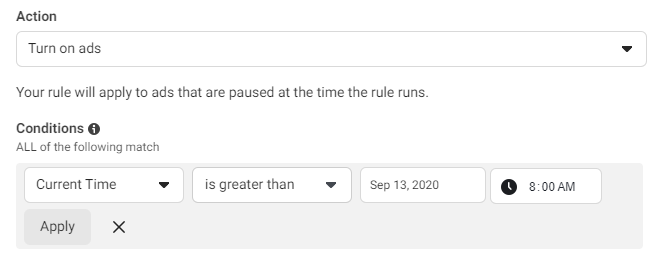
This strategy will help you save money on ineffective hours.
Conclusion
It will certainly take time on experiments through trial and error to find the actions and conditions that work best for you.
But don’t try to get off the beaten track when you’re just starting with the automated rules. It’s not the right place to reinvent the wheel. Select the actions that you usually did when you saw that your CPC was too high or Purchases were too low.
The process is the same. The only difference is that instead of taking actions manually, you “turn on the alarm clock” that rings under preferred circumstances.